
Adding audio to a presentation can make your slides more engaging, interactive, and memorable. Whether you’re creating a classroom lesson, business presentation, sales pitch, training module, or portfolio, audio helps explain ideas more effectively than text alone.
Google Slides includes a built-in audio feature that lets you insert music, voice recordings, podcasts, or sound effects directly into individual slides. Once added, you can configure the audio to play automatically, loop continuously, or start only when clicked.
This guide walks you through everything you need to know about adding audio to Google Slides, including supported formats, playback settings, troubleshooting tips, and best practices.
Can You Add Audio to Google Slides?
Yes.
Google Slides allows you to insert audio files directly into your presentation, provided the files are stored in Google Drive.
Common use cases include:
- Voice narration
- Background music
- Sound effects
- Language pronunciation
- Educational explanations
- Meeting recordings
- Product demonstrations
- Podcast clips
Unlike embedding audio from external websites, Google Slides stores the audio reference through Google Drive, ensuring reliable playback when shared with others who have the appropriate permissions.
Supported Audio Formats
Google Slides supports several common audio formats, including:
- MP3 (recommended)
- WAV
- OGG
For the best compatibility across browsers and devices, MP3 is generally the safest choice because it offers excellent quality with smaller file sizes.
Before inserting audio, upload the file to Google Drive and ensure anyone viewing the presentation has permission to access it if required.
How to Add Audio to Google Slides?
Follow these simple steps.
Step 1: Upload the Audio File
Open Google Drive and upload your audio file.
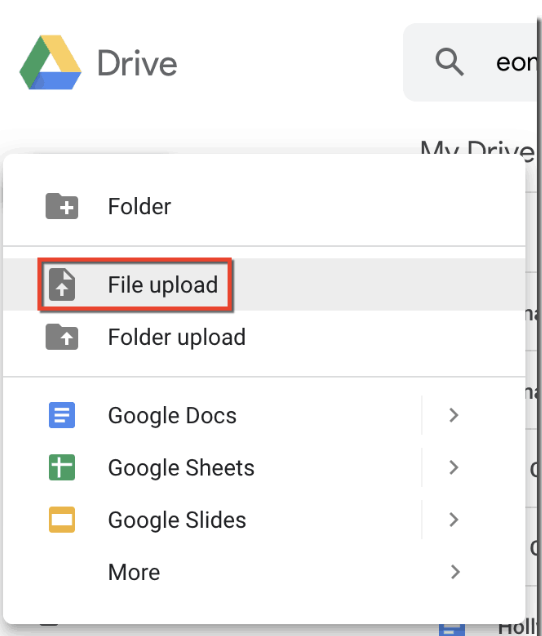
Supported examples include:
- Voice recordings
- MP3 music
- Narration
- Podcast excerpts
- Sound effects
Wait until the upload completes.
Step 2: Open Your Presentation
Open Google Slides.
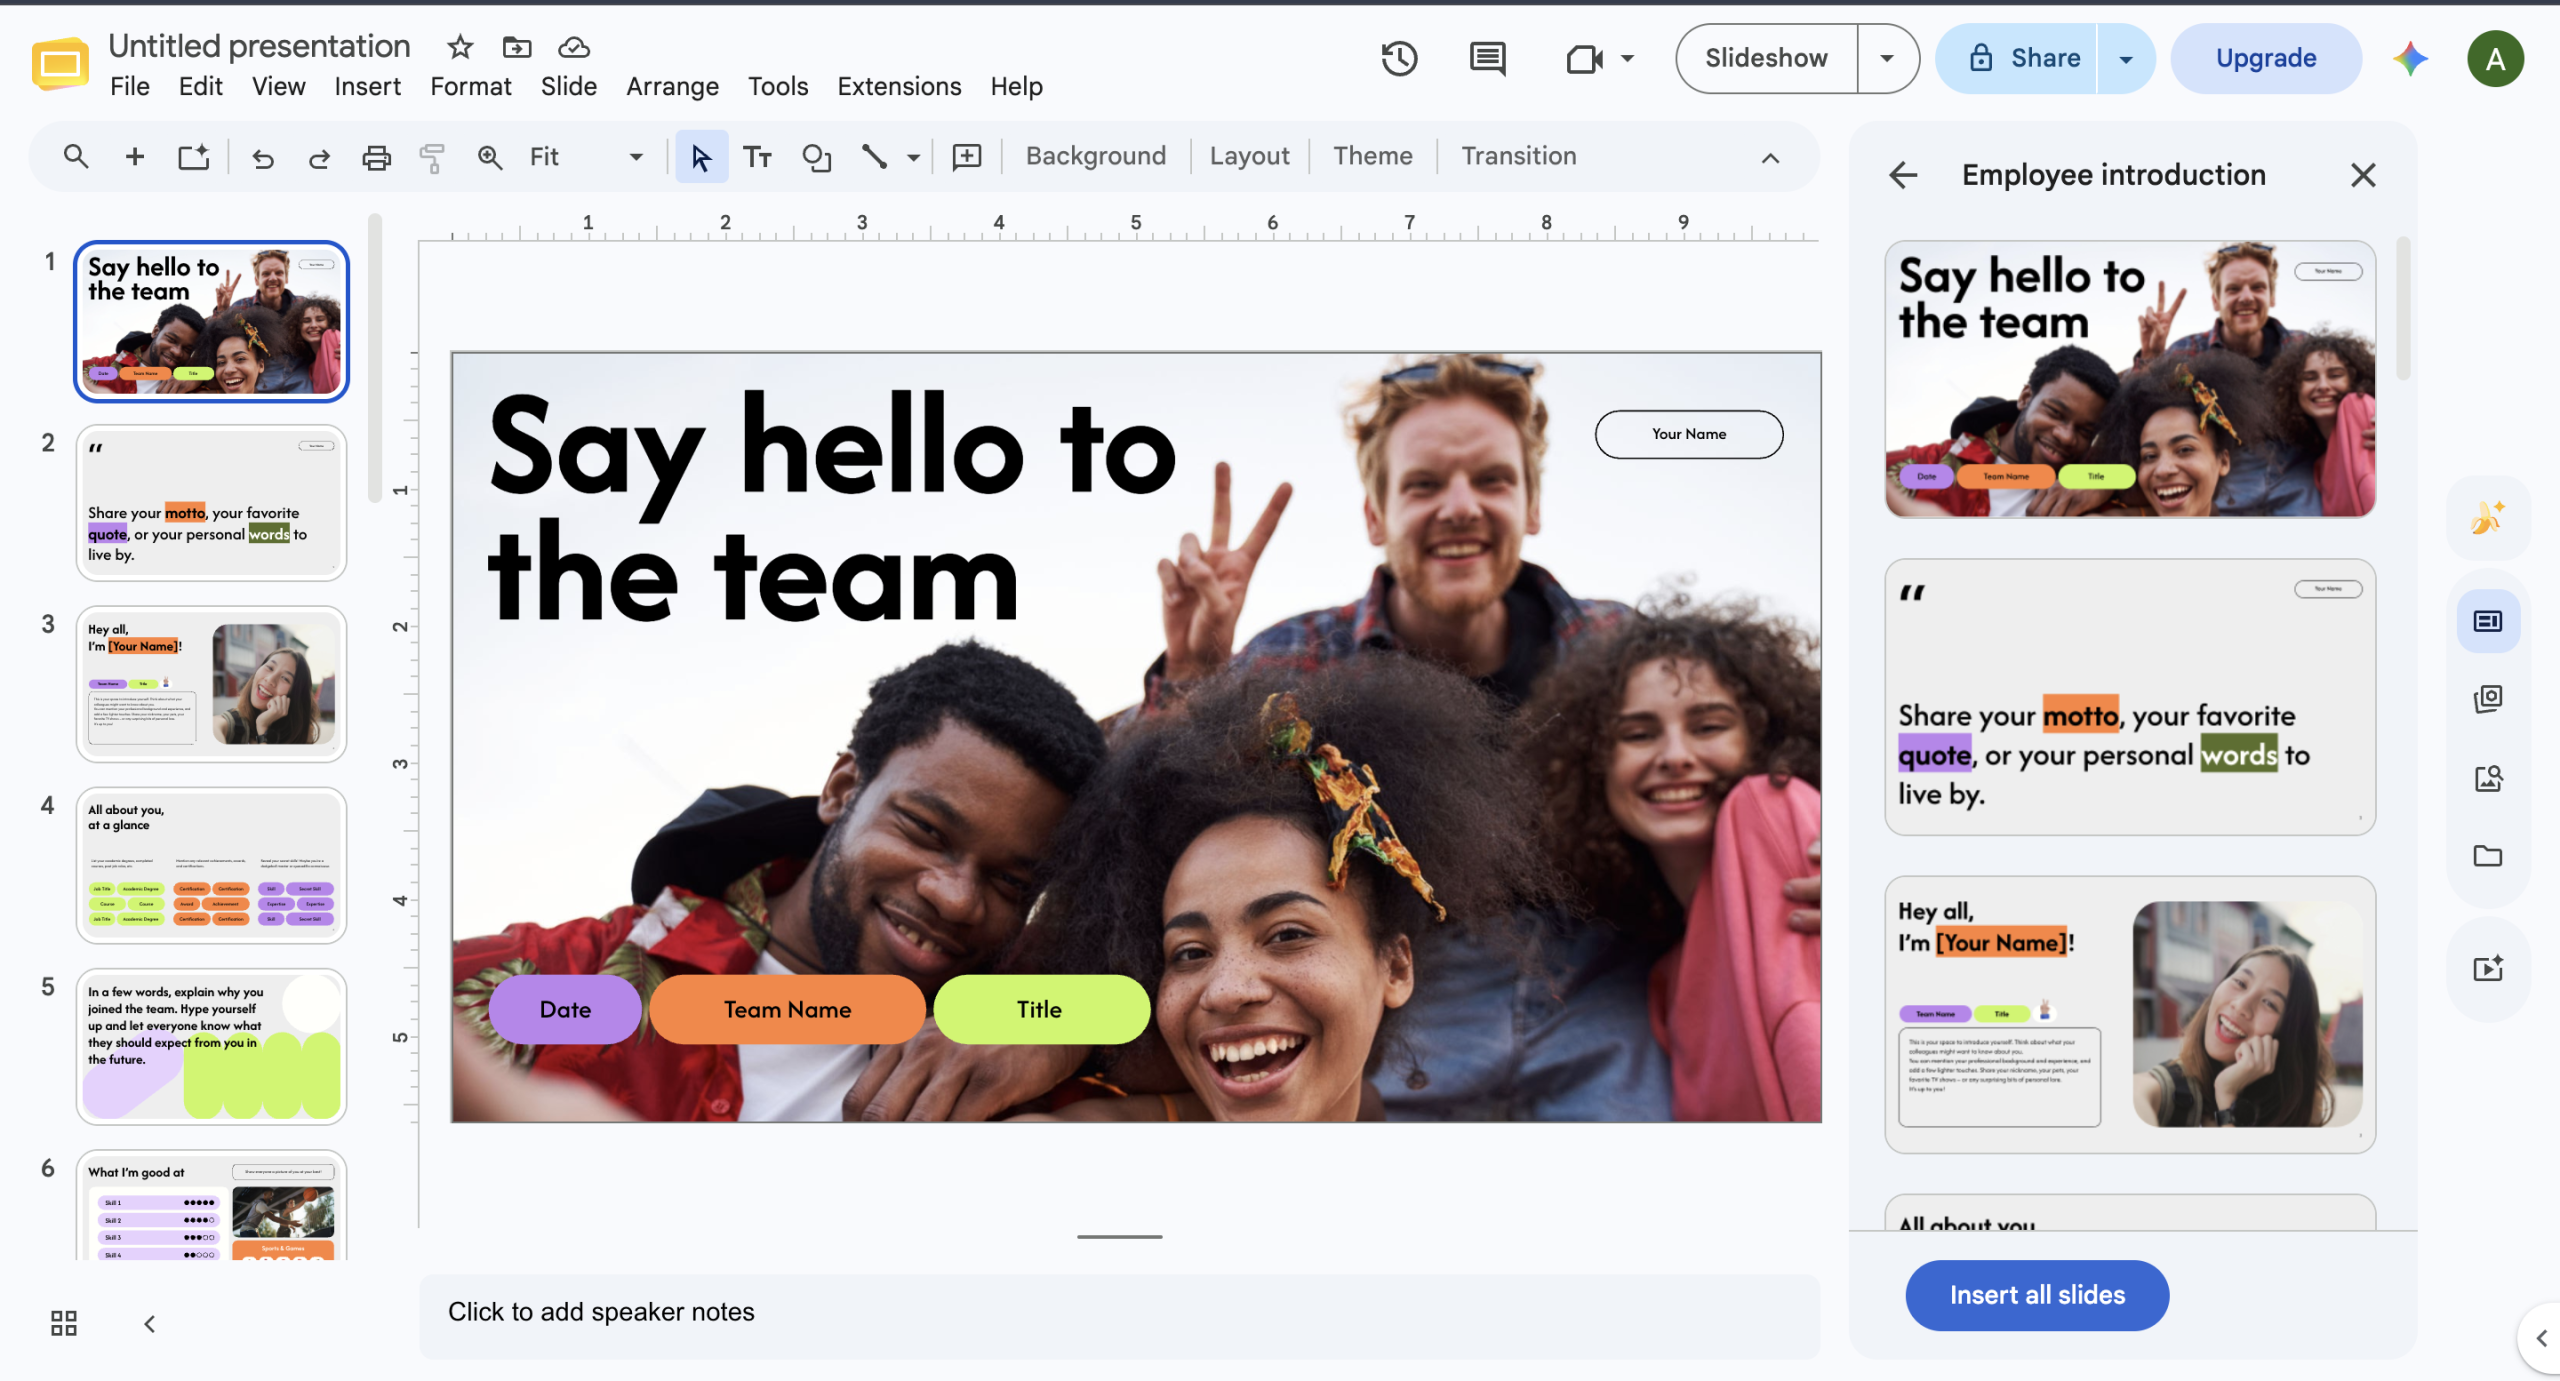
Navigate to the presentation where you want to include the audio.
Select the slide that should contain the audio.
Step 3: Insert Audio
Click:
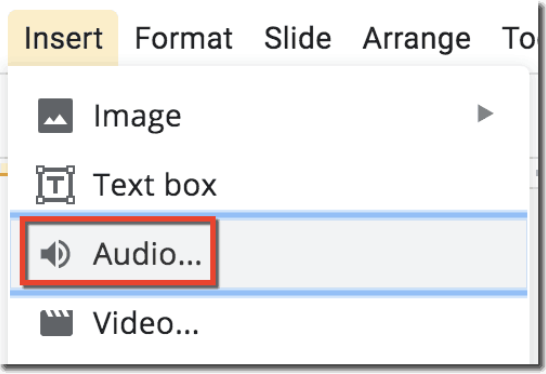
Insert → Audio
A window will display audio files available in your Google Drive.
Choose the desired file.
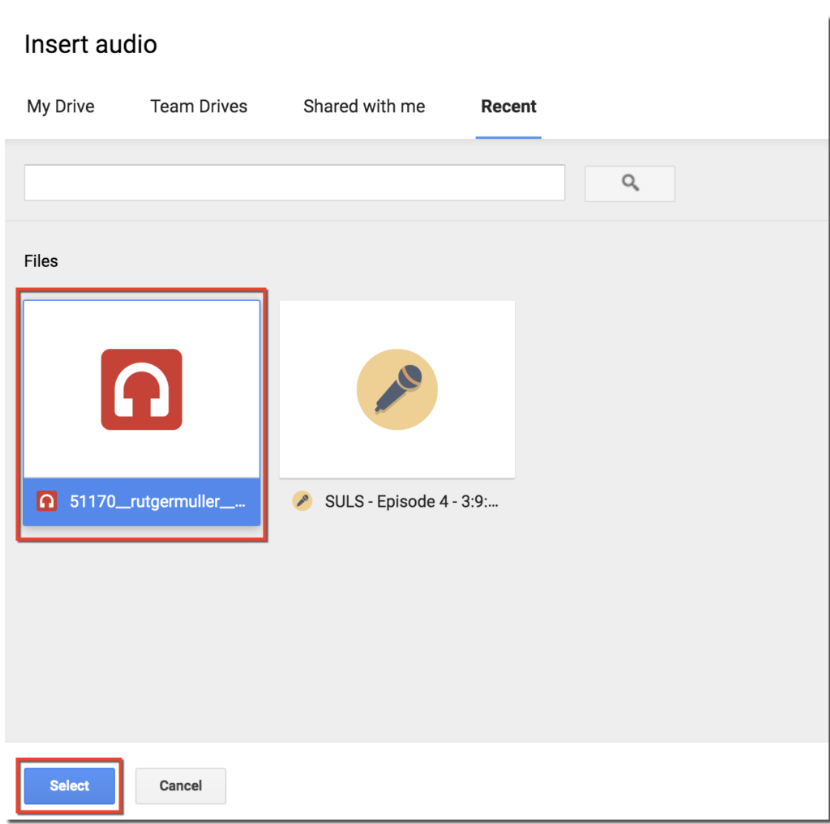
Click Select.
Google Slides places a speaker icon on the slide, representing the inserted audio.
Step 4: Position the Audio Icon
You can move the speaker icon anywhere on the slide.
Many presenters place it:
- In a corner
- Behind an image
- Outside the visible slide area (if appropriate)
- Near instructions for learners
The icon’s location does not affect playback.
Step 5: Configure Playback Settings
Click the audio icon.
Open Format Options.
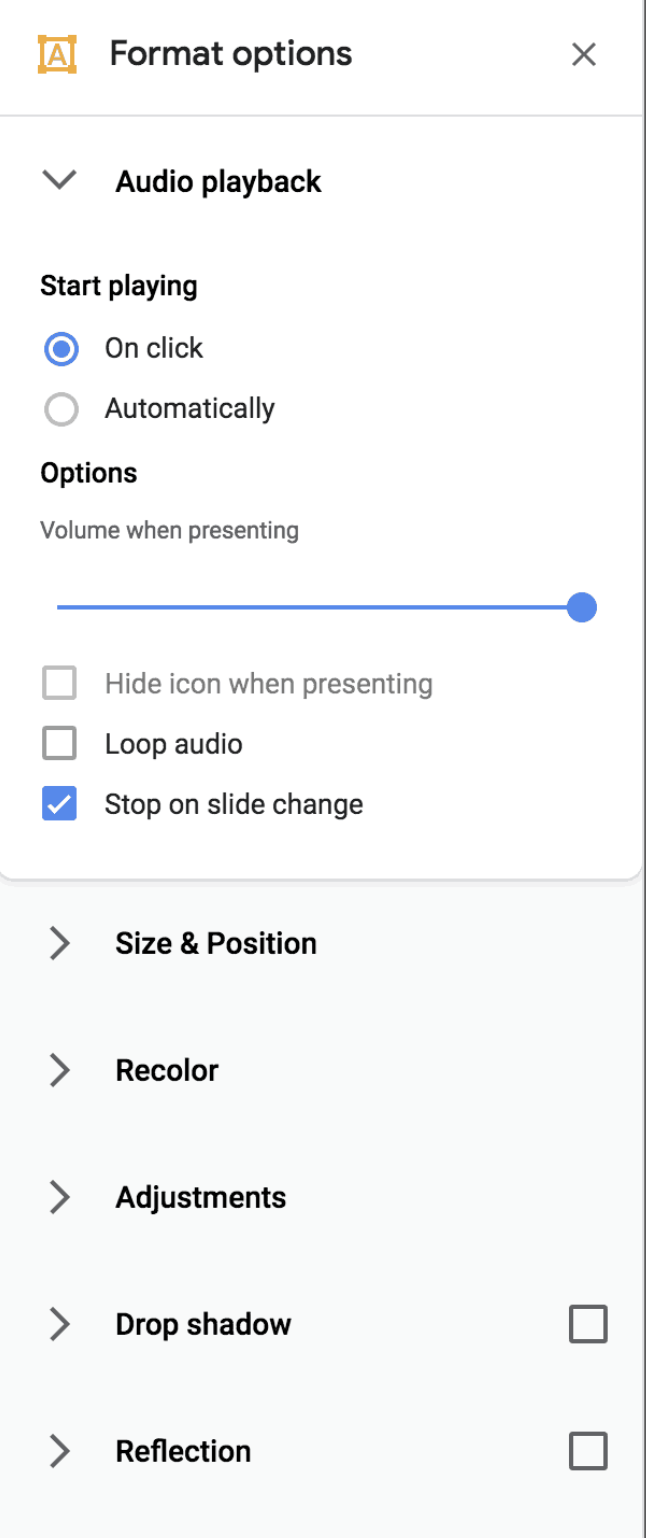
You’ll see playback controls such as:
- Play on click
- Play automatically
- Hide icon during presentation
- Loop audio
- Stop on slide change
- Volume adjustment
These settings let you tailor the listening experience for your audience.
How to Make Audio Play Automatically?
Automatic playback is useful when creating:
- Online lessons
- Self-paced courses
- Business demos
- Digital kiosks
- Product walkthroughs
To enable autoplay:
- Select the audio icon.
- Open Format Options.
- Under Audio Playback, choose Automatically.
Now the audio starts as soon as the slide appears during the presentation.
How to Loop Audio in Google Slides?
Looping repeats the audio until the presentation moves to another slide or the presentation ends.
To loop audio:
- Select the speaker icon.
- Open Format Options.
- Enable Loop Audio.
This works well for:
- Background music
- Ambient sounds
- Exhibition displays
- Waiting screens
- Trade show presentations
How to Hide the Audio Icon?
If you don’t want your audience to see the speaker icon:
- Click the inserted audio.
- Open Format Options.
- Enable Hide icon when presenting.
The audio will still play according to your selected playback settings, but the icon won’t appear during slideshow mode.
Can You Add Voice Narration?
Absolutely.
Many educators, trainers, and professionals record their own voice and upload it as an MP3 file to Google Drive before inserting it into Google Slides.
Voice narration is especially useful for:
- Online learning
- Employee onboarding
- Product training
- Client presentations
- Sales demonstrations
- Investor pitches
You can record narration using any audio recording software, export it as an MP3, upload it to Google Drive, and insert it using the same steps described above.
Tips for Better Audio Quality
To create a professional presentation:
- Record in a quiet environment.
- Use a dedicated microphone when possible.
- Remove background noise before uploading.
- Keep narration concise.
- Normalize audio volume so each recording sounds consistent.
- Test playback on multiple devices.
- Use high-quality MP3 files for better compatibility.
Clear audio significantly improves the viewer’s experience and helps maintain engagement throughout your presentation.
Create Professional Presentations Faster with AI
Once you’ve added audio to your Google Slides presentation, you may also want to improve the overall design, structure, and visual appeal of your slides.
Instead of manually designing every slide, consider using AI Presentations App to generate professional presentations in minutes. You can create complete slide decks from a topic, text, PDF, Word document, YouTube video, images, or other content sources. The generated presentations are fully editable, making it easy to refine your slides before adding narration or background audio in Google Slides.
This workflow combines AI-powered content creation with Google Slides’ collaboration and audio features, helping students, educators, marketers, and business professionals create polished presentations much faster.
Why Is Audio Not Playing in Google Slides?
Sometimes your audio may not play as expected. The issue is usually related to file permissions, browser settings, or unsupported formats rather than Google Slides itself.
Here are the most common problems and their solutions.
1. Google Drive Permissions
Google Slides references audio files stored in Google Drive. If viewers don’t have permission to access the file, the audio won’t play.
Solution:
- Open Google Drive.
- Right-click the audio file.
- Select Share.
- Grant appropriate viewing permissions or adjust the sharing settings if the presentation is intended for a wider audience.
2. Unsupported Audio Format
Google Slides works best with:
- MP3
- WAV
- OGG
If your audio uses another format, convert it to MP3 before uploading.
3. Browser Issues
Older browsers or disabled media permissions may prevent playback.
Try the following:
- Refresh the presentation.
- Update your browser.
- Clear your browser cache.
- Test the presentation in another browser.
4. Audio File Was Deleted
If the original file is removed from Google Drive, Google Slides can no longer access it.
Solution:
Restore the deleted file or upload it again and reinsert the audio.
5. Internet Connection
Google Slides relies on cloud-based files. A poor internet connection may delay or interrupt playback.
If you’re presenting in an environment with unreliable internet, test everything beforehand or consider downloading the presentation if your workflow supports offline access.
Best Practices for Adding Audio in Google Slides
Adding audio can enhance your presentation, but it should support your message rather than distract from it.
Follow these best practices:
- Keep narration concise and focused.
- Use background music sparingly.
- Maintain a consistent audio volume throughout the presentation.
- Avoid overlapping multiple audio tracks.
- Test playback on desktop and mobile devices.
- Use autoplay only when it improves the viewer’s experience.
- Ensure audio aligns naturally with the slide content.
- Optimize audio files to reduce loading time.
- Always preview the entire presentation before sharing.
Well-planned audio can improve engagement, especially in educational lessons, product demos, webinars, and self-guided presentations.
Common Mistakes to Avoid
Many users encounter avoidable issues when working with audio in Google Slides.
Avoid these common mistakes:
- Uploading unsupported audio formats.
- Forgetting to upload files to Google Drive.
- Restricting access to the audio file.
- Using poor-quality recordings with background noise.
- Playing loud background music over narration.
- Leaving autoplay enabled where manual playback is more appropriate.
- Not testing the presentation before a live audience.
Taking a few extra minutes to review your presentation can help prevent technical issues during delivery.
Final Thoughts
Adding audio to Google Slides is an excellent way to create more engaging, informative, and memorable presentations. Whether you’re using voice narration, background music, or instructional sound effects, the built-in audio feature makes it easy to enhance your slides without requiring advanced technical skills.
Following the steps in this guide, you can confidently insert audio, configure playback settings, troubleshoot common issues, and deliver presentations that capture your audience’s attention.
If you’re looking to save even more time, consider creating your presentation with AI Presentation Tool mentioned above before importing it into Google Slides. AI-generated content, professionally designed layouts, and fully editable slides can dramatically reduce presentation creation time while helping you produce polished, presentation-ready results.
Whether you’re a student, educator, business professional, or content creator, combining AI-powered presentation generation with Google Slides’ audio capabilities is an effective way to create presentations that are both visually impressive and highly engaging.
Frequently Asked Questions
Can I add audio directly from my computer?
Not directly. First upload the audio file to Google Drive, then insert it into Google Slides using Insert → Audio.
What audio formats does Google Slides support?
Google Slides supports MP3, WAV, and OGG audio files. MP3 is generally recommended for the best compatibility.
Can I make audio play automatically?
Yes. Select the audio icon, open Format Options, and choose Play Automatically.
Can I loop background music?
Yes. Enable the Loop Audio option in the playback settings.
Can I hide the speaker icon?
Yes. Use Hide icon when presenting under the audio playback settings.
Can I record audio inside Google Slides?
No. Google Slides does not include a built-in audio recorder. Record your narration with another application, save it as an MP3, upload it to Google Drive, and then insert it into your presentation.
Why can’t others hear my audio?
Most playback issues occur because viewers don’t have permission to access the audio file in Google Drive or because the file has been moved or deleted.
Can I use background music across multiple slides?
Google Slides doesn’t support continuous background music across all slides. Audio is attached to individual slides, although looping can keep it playing while that slide remains active.
Does Google Slides support voice narration?
Yes. You can record your narration separately, upload it to Google Drive, and insert it into any slide.
Is adding audio to Google Slides free?
Yes. Anyone with a Google account can use the built-in audio feature at no additional cost.
Must read: How to Transfer PowerPoint to Google Slides (Without Losing Formatting)